
How to Optimize Images for Your Website: The Complete Guide
Let’s talk about optimize images for website and why it matters for your business.
📋 Table of Contents
Your Website Is Probably Bleeding Money Because of Images
Let me guess. You’ve got a beautiful website with stunning high-resolution photos. Maybe you hired a photographer to take gorgeous product shots or invested in professional headshots for your team page. The images look incredible on your laptop screen.
And they’re absolutely destroying your business.
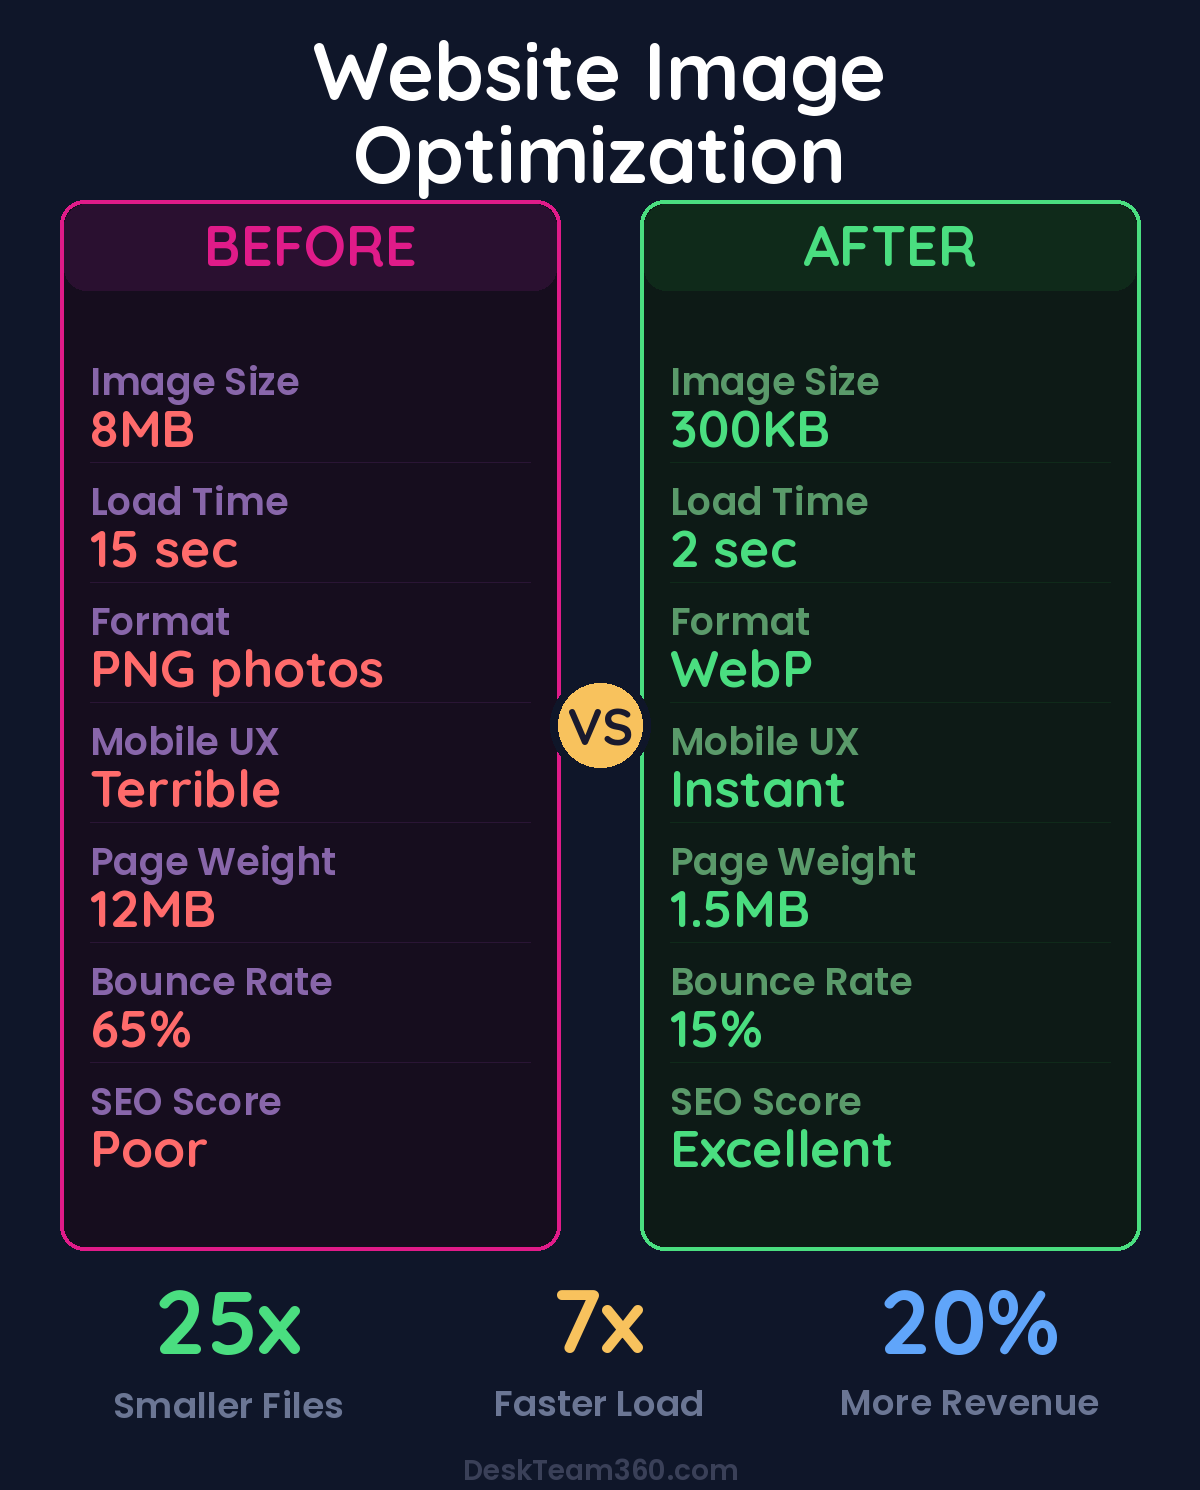
I’m talking about 8MB hero images that take forever to load. Product galleries that make mobile users wait 15 seconds for a single photo to appear. Homepage carousels with uncompressed images that are larger than most people’s entire photo albums.
After helping 400+ clients optimize their websites, I can tell you that images are the single biggest website performance killer for small and mid-size businesses. Not bloated plugins. Not bad hosting. Images. Specifically, images that haven’t been optimized for the web.
The math is brutal. A 1-second delay in page load time reduces conversions by 7%. Half your mobile visitors abandon sites that take longer than 3 seconds to load. Google actively penalizes slow sites in search rankings. Every oversized image on your site is costing you customers and revenue.
Here’s how to fix it without making your site look like garbage.
Most Businesses Are Doing Image Formats Completely Wrong
Walk into any small business and check their website’s image folder. I guarantee you’ll find PNG files for photographs (massive waste), JPEG files for logos (looks terrible), and zero WebP files (missing massive optimization opportunity).
The format you choose for each image type matters more than most people realize. Pick wrong, and you’re serving files that are 3-5x larger than they need to be. Pick right, and you get identical visual quality at a fraction of the file size.
Let’s break down when to use what. JPEG is your workhorse for photographs and complex images with lots of colors. Product photos, team headshots, hero images, anything that started life as a camera shot should be JPEG. Quality setting of 75-85% hits the sweet spot where compression artifacts aren’t visible but file sizes drop dramatically.
PNG is for graphics that need transparency and nothing else. Your logo, icons, screenshots, graphics with text overlays. If it doesn’t need transparency, don’t use PNG for web images. I’ve seen businesses serve 3MB PNG product photos when the same image as a compressed JPEG would be 200KB. Same visual quality, 15x smaller file.
WebP is what you should be using for almost everything in 2024. It supports both lossy and lossless compression, transparency, and animation. Browser support is universal now. Safari was the last holdout and they added support in 2020. WebP should be your default format unless you have a specific reason to use something else.
SVG is for logos, icons, and simple graphics that need to scale perfectly across different screen sizes. It’s vector-based, so a logo looks crisp at 50 pixels or 500 pixels, and file sizes are tiny.
Here’s the reality check most businesses need: if you uploaded images straight from your camera or designer without thinking about web optimization, you’re probably serving files that are 5-10x larger than necessary.
Free 5-Minute Video
See How DeskTeam360 Works in Under 5 Minutes
Watch the short video and see exactly how we handle design, development, and marketing implementation — so you don't have to.
Watch the Video →
The Resize-First Rule That Saves More Bandwidth Than Compression
Before you compress anything, resize your images to the dimensions they’ll actually display at. This is where I see businesses waste the most bandwidth.
Your hero image displays at 1200 pixels wide on desktop and 375 pixels wide on mobile. There’s zero reason to upload a 4000-pixel-wide image and make the browser download all those extra pixels just to scale it down. You’re making every visitor download massive files for pixels they’ll never see.
The rule is simple: export images at 2x the display size for retina screen support. If something displays at 600 pixels wide, export it at 1200 pixels. That’s it. Anything larger is waste.
I audited a client’s site last month where the hero image was 6000 pixels wide, displaying at 1000 pixels on desktop. That single image was 12MB. After resizing to 2000 pixels and compressing properly, it was 180KB. Identical visual quality, 66x smaller file size. Their homepage load time dropped from 8 seconds to under 2.
Pro tip: Check your current images by right-clicking and selecting “Inspect Element” in your browser. Look at the image’s display size versus its actual file dimensions. If there’s a huge difference, you’re wasting bandwidth.
Related reading: Outsource Course Creation and Design: The Complete Production Guide.
Most WordPress themes automatically generate multiple image sizes when you upload, but that doesn’t help if you uploaded a massive original file. The theme might create a 1200-pixel version for your hero section, but if your original was 8000 pixels, that “optimized” version is still probably 2-3MB when it could be 300KB.
Lazy Loading: Don’t Download What People Can’t See
Lazy loading is one of those techniques that sounds more complicated than it is. Instead of downloading every image on a page immediately, lazy loading only downloads the images visible on screen. Images below the fold load as users scroll toward them.
For most websites, this cuts initial page load time by 40-60%. Your hero image and above-the-fold content load instantly. Everything else loads on-demand.
The best part? It’s dead simple to implement. Add `loading=”lazy”` to your image tags and modern browsers handle the rest. WordPress 5.5+ includes this by default for most images.
Watch out: Don’t lazy load your hero image or anything else visible immediately when the page loads. This actually hurts performance because it delays your Largest Contentful Paint score, which Google uses as a ranking factor.
Related reading: What Is White Label Marketing? The Complete Guide for Agencies.
The one mistake I see constantly is lazy loading everything, including above-the-fold images. Your hero image should load immediately. Your logo should load immediately. Anything users see without scrolling should load immediately. Only images below the initial viewport should be lazy loaded.
If you’re using WordPress, most performance plugins handle this automatically and know not to lazy load critical images. But if you’re implementing manually or using a custom theme, be strategic about which images get the lazy loading treatment.
Alt Text: The Accessibility Win That Also Improves SEO
Alt text describes images for screen readers and search engines. Most businesses either skip it entirely or write terrible alt text that helps no one.
Good alt text serves two purposes. It makes your site accessible to visually impaired users who rely on screen readers. And it helps search engines understand what your images show, which can improve your rankings and get your images found in Google Image Search.
Writing effective alt text isn’t rocket science, but there’s a right way and a wrong way. Be descriptive and specific. “Two people shaking hands in a modern office” tells screen readers and search engines exactly what’s in the image. “Photo” or “image” tells them nothing.
Include relevant keywords naturally, but don’t stuff them. If the image is on a page about web design services and shows someone working on a laptop, mentioning web design in the alt text makes sense. But “web design services web designer website development” is keyword stuffing and helps no one.
Every content image needs alt text. Decorative images that add no information can use empty alt text (alt=””), but if an image conveys information or supports your content, it needs a proper description.
We break this down further in e-commerce website cost: real breakdown from shopify to custom builds.
For industry research and benchmarks, check out WordPress Developer Resources.
Keep alt text under 125 characters because screen readers may cut off longer descriptions. Don’t start with “Image of” or “Photo of” because screen readers already announce that it’s an image.
For businesses that care about local SEO, including location-specific details in alt text can help. “Team meeting in Chicago office” is better than just “team meeting” if you’re trying to rank for Chicago-based searches.
If you’re serious about website accessibility beyond just images, our comprehensive guide on ADA website compliance covers everything you need to know about making your site usable for everyone.
CDNs: Serve Images From Servers Close to Your Visitors
A Content Delivery Network stores copies of your images on servers around the world and serves them from the location closest to each visitor. If your hosting is in Virginia but someone visits from London, the CDN serves images from a London server instead of sending them across the Atlantic.
For images specifically, this typically improves load times by 40-60% for visitors who aren’t geographically close to your hosting server. It’s especially noticeable for international visitors or if you have a geographically distributed audience.
The setup varies by CDN, but most integrate with WordPress through plugins or simple DNS changes. Cloudflare offers a free tier that includes CDN services. More specialized options like Cloudinary and Imgix focus specifically on image optimization and delivery, with features like automatic format conversion and real-time image resizing.
For businesses with mostly local customers, a CDN might be overkill. But if you serve customers across multiple states or countries, it’s one of the highest-impact performance improvements you can make. The difference between loading an image from a nearby server versus one 3,000 miles away is dramatic.
Understanding how CDNs fit into your overall WordPress speed optimization strategy helps you prioritize which performance improvements will have the biggest impact for your specific situation.
The Tools That Actually Work for Image Compression
You don’t need expensive software to optimize images properly. Here are the tools I recommend to clients based on their technical comfort level and volume needs.
For one-off optimization or small batches, Squoosh.app is excellent. It’s Google’s free online tool that lets you compare different formats and compression levels side-by-side. Upload an image, experiment with settings, and see exactly how different choices affect file size and quality. TinyPNG is another solid online option that’s incredibly simple to use.
WordPress users should look at ShortPixel Image Optimizer or Imagify. These plugins automatically compress images on upload and can bulk-optimize existing media libraries. ShortPixel’s free tier gives you 100 optimizations per month, which is plenty for most small business websites. Imagify is from the team behind WP Rocket and integrates well with other performance plugins.
For desktop workflows, ImageOptim on Mac is fantastic for batch compression. FileOptimizer on Windows does similar work. If you’re already using Adobe Creative Suite, Photoshop’s “Export for Web” feature gives you fine-grained control over compression settings and format choices.
Properly optimized images can reduce your total page weight by 60-70% without any visible quality loss.
The key is building optimization into your workflow rather than treating it as an afterthought. If you’re uploading images manually, resize and compress before upload. If you have team members who add content regularly, train them on proper image sizing or set up automated tools that handle it.
Common Mistakes That Waste Time and Bandwidth
I’ve audited hundreds of websites, and the same image optimization mistakes come up constantly. Here’s what to avoid.
Uploading images straight from a camera is the biggest one. Modern cameras shoot in resolutions that are massive overkill for web use. A single uncompressed photo can be 15-20MB. Always resize and compress before uploading, even if you have a plugin that will compress later. Starting with a 300KB optimized image instead of a 15MB original will always give better results.
Using PNG for photographs is another bandwidth killer. I see this constantly with product photos. A product image saved as PNG might be 3MB. The exact same image as a compressed WebP could be 150KB with identical visual quality. PNG has its place, but it’s not for photographs.
Lazy loading above-the-fold images hurts performance instead of helping. Your hero image, logo, and anything visible without scrolling should load immediately. Only images below the initial viewport should be lazy loaded.
Ignoring existing images when implementing optimization is common. New uploads get optimized, but thousands of old images in your media library stay bloated. Most optimization plugins can bulk-process existing images, and it’s worth doing.
Missing alt text entirely is bad for accessibility and SEO. Every meaningful image should have descriptive alt text. Decorative images can use empty alt text, but content images need proper descriptions.
Relying entirely on plugins without understanding the basics leads to suboptimal results. Plugins help, but uploading a 10MB image and letting a plugin compress it to 2MB is worse than uploading a properly optimized 300KB image in the first place.
Testing and Measuring Your Results
After optimizing images, verify that your changes actually improved performance. Google PageSpeed Insights is the most important tool because it reflects the metrics Google uses for rankings. Test both mobile and desktop scores, and pay particular attention to Largest Contentful Paint, which often correlates directly with image optimization.
GTmetrix provides detailed waterfall charts showing exactly how long each image takes to load and what percentage of your total page weight they represent. Before optimization, images might represent 70-80% of page weight. After proper optimization, they should be 30-50% or less.
Chrome DevTools Network tab shows the actual file sizes and load times for every resource on your page. Load your page with DevTools open and sort by size to see your largest images. This is also useful for spotting images that didn’t get optimized properly.
WebPageTest offers more advanced testing from multiple geographic locations and connection speeds. This is especially valuable if you’re implementing CDN changes or want to see how your site performs for visitors with slower internet connections.
Regular monitoring should be part of your ongoing website maintenance routine. Image optimization isn’t a one-time task because new images get added regularly. Monthly audits to catch unoptimized uploads and verify that automated tools are working correctly prevent performance regression over time.
The Revenue Impact of Faster Images
Let’s talk numbers, because image optimization directly impacts your bottom line in ways that are measurable and significant.
A typical small business website goes from 4-5 second load times to under 2 seconds after proper image optimization. That improvement translates to approximately 15-20% higher conversion rates based on industry studies and client data I’ve tracked.
For an e-commerce site doing $50K/month in revenue, that’s $7,500-10,000 in additional monthly revenue from the same traffic volume. For a service business generating 50 leads per month, that’s 8-10 additional leads monthly from improved user experience.
SEO benefits compound over time. Google’s algorithm heavily weights page speed and user experience signals. Faster sites rank better, get more organic traffic, and maintain lower bounce rates. I’ve tracked clients who saw 25-40% increases in organic traffic within 3-6 months of implementing comprehensive speed optimizations, with image optimization being the largest component.
Mobile users see the biggest improvement because they’re often on slower connections and less powerful devices. Since mobile traffic represents 60%+ of visitors for most businesses, optimizing for mobile performance has outsized impact on overall business results.
Build Image Optimization Into Your Process
The businesses that succeed long-term with website performance treat image optimization as part of their standard workflow, not a one-time project. Every image that goes on your site should follow the same optimization process: resize to appropriate dimensions, choose the right format, compress appropriately, write descriptive alt text, and implement lazy loading for below-the-fold images.
Train anyone who uploads content on proper image sizing and optimization. Set up automated tools where possible. Schedule monthly audits to catch optimization opportunities and verify that your tools are working correctly.
The performance gains are immediate and compound over time. Better load times mean better user experience, higher conversion rates, improved search rankings, and increased revenue. It’s one of those rare website improvements that benefits literally every business metric that matters.
For businesses that want to focus on growing instead of managing technical details, our team handles comprehensive WordPress maintenance and optimization, including ongoing image optimization, performance monitoring, and speed improvements that keep your site performing at its best while you focus on serving customers.
Free Template
The Ultimate Task Delegation Template
Stop guessing what to hand off. This template shows you exactly what to delegate, how to brief it, and how to QA the results.
Get the Free Template →